
Randonneurs USA
© 1998-2015, Randonneurs USA
This Document and RUSA Rules for Organizers.
Your Volunteers and the RBA Procedures
Regional Brevet Administrators
RBA Resignation and Succession
When a RUSA Brevet vs. an ACP Brevet?
Getting Your Event on the Calendar
Canceling or Rescheduling Events
Scheduling Grand Randonnées (1200km and Longer)
Event Listings in the Newsletter
Controlling for Route Integrity
When to Use an Event-Staffed Control
Elevation Challenges and Control Time Windows
Intermediate Control Time Windows and Longer Randonnées
Preparing Cue (Route) Sheets and Maps
Services, Intermediate Towns and Passes
Contact, Abandonment and Emergency Numbers
Getting Your Route Approved by RUSA
Communicating with the Routes Committee
Other Route Considerations and Notes
Automobile Odometers and Bike Computer Calibration
Computer Mapping Software and Physical Verification
Transfers and Forced Time Off The Bike
Crossing Public Lands and Other Jurisdictions
BRM Medal Design (for ACP-sanctioned brevets)
Using the Result Submission Form
Submitting Results - Direct Entry Method
Submitting Results - Spreadsheet Method
Posting Results on Your Website
Making Your Own Labels for RUSA-Sanctioned Events.
Introduction
Welcome to the Randonneurs USA RBA Policies and Procedures. This document is a resource you can use in organizing your brevets and details what RUSA expects of each Regional Brevet Administrator (RBA).
Experienced American brevet organizers developed these procedures to work successfully within the Audax Club Parisien (ACP) Rules for Organizers, upon which ours are based. As the ACP frequently says, "Brevets are not casual affairs," and thus, it is essential that all RBAs follow these procedures in order to maintain the integrity of American randonneuring events and to process their riders' results correctly.
Riders may be riding your brevets to qualify for a 1200km event, to earn ACP or RUSA awards, or for personal goals. Most qualifications have time-critical deadlines. For this reason, it is important to submit results in a timely and accurate manner. It is also important to remember that each of the officers at RUSA volunteers their time to validate your calendar, routes, and results; doing things incorrectly makes extra work for everyone.
Read these Procedures carefully; if you have any questions feel free to contact the RUSA RBA Liaison, the RUSA Brevet Coordinator, or the RUSA President. In the meantime, Randonneurs USA offers every RBA sincere gratitude for giving American randonneurs quality events to ride.
This Document and RUSA Rules for Organizers
This document includes:
- procedures to follow in carrying out your RBA duties,
- tips for carrying out your RBA duties and organizing successful events and regions,
- policies, which have the force of rules on a level with and extension of the Rules for Organizers.
[1/2012]
Your Volunteers and the RBA Procedures
Many RBAs delegate some of their route (or other) duties to other club volunteers. It is your volunteers’ responsibility to read this document and familiarize themselves with the relevant parts of the procedures, and your responsibility to assure they’ve done so, to save time and energy for all concerned.
[11/2009]
Regional Brevet Administrators
RBA Application
Regional Brevet Administrators (RBAs) organize and supervise brevets, flèches, and other randonneur events in their area. If there is no brevet series nearby and you have the necessary skills and time to organize one, please submit an RBA Application [Word (e-mailable) or PDF]
Your RUSA Members’ Handbook has a very useful article about beginning the RBA process and how to design successful events. In addition, the RBA Liaison will be happy to work with you and answer your questions.
RBA Communication
The primary way that RUSA officials communicate with RBAs is via electronic mail. It is important to have a reliable way of receiving and sending e-mail.
In addition, RUSA places RBAs on an electronic mailing list. RUSA officials and volunteers make announcements of general interest to RBAs via this mailing list. You should direct questions and discussion to this list, especially if it might be of interest or helpful to other RBAs.
Notify the RBA Liaison if you need to change any of the following contact information:
· e-mail address
· physical address
· phone
· website
RBA Resignation and Succession
RUSA encourages RBAs who are planning to resign, to identify a successor as far in advance as possible. This will assure continuation of a region’s event schedule and minimize the impact on ridership. Communication with the RBA Liaison about the intent to resign aids in a smooth transition and notifies the Board of plans for the region. This also facilitates a smooth application process for the successor RBA.
The timing of an RBA's resignation and the application of the successor are critical due to the scheduling and approval of events.
RBAs should make every effort to notify the Board of a resignation no later than July 15 of the RBA's final season of events.
If a successor is available and has not already been identified to the RBA Liaison, the existing RBA should supply the name and a recommendation when sending the notice of resignation to the Board.
Note that the board may need to cancel some or all of the region’s events if an RBA resigns on short notice or after July 15 of the RBA’s final season.
In all cases, a prospective successor RBA must submit an RBA application by August 1 in order to hold ACP events the following year. As noted in the application procedures, the successor RBA submits the application to the RBA Liaison who brings it before the Board for approval.
RBA Reactivation
If an RBA allows his/her region to become inactive (e.g., by holding no events in a given year), the RBA may apply for reinstatement via the RBA Reactivation Form. The Board will consider the RBA’s original qualifications and track record during previous RBA tenure, and also take into account the current “landscape” of nearby regions and their offerings, which may have changed in the interim.
[4/2010]
Changing Sponsoring Club
[2/2011]
You may need or desire to change your region’s sponsoring club. (See RUSA’s table of region history for examples of where this has occurred.) Possible reasons for doing so:
· The sponsoring club has changed its mission or focus.
· You initially chose a local general-purpose club as sponsoring club to get started, but as your program has grown and matured, you’d now like to form a dedicated randonneuring club.
· Any number of other organizational, personal, or administrative factors may have cropped up.
To change sponsoring clubs:
· Contact the RBA Liaison with your intention, planned date of sponsorship change, and name of new sponsoring club. If the new sponsoring club does not have an ACP code, RUSA will create one for it.
· You may wish to contact those RUSA members whose RUSA affiliation is with the old sponsoring club, in case they’d like to change their affiliation. They may do so by contacting the Membership Chairman. (You can use Member Search to find members of a given affiliation.) You might also take the opportunity to contact unaffiliated (Independent) or RUSA-affiliated local riders in case they’d like to affiliate with the new sponsoring club.
Events
Event Types
RBAs can choose to organize any of a number of randonneur event types. Event types differ in their format, distance, applicable rules, sanctioning body, submission deadline, how results are handled, and many other details. The table below summarizes the event types.
|
Event Type |
Format/Distance |
|
RM randonnée |
A brevet of 1200km or more, sanctioned by Randonneurs Mondiaux. Special application process. Significant lead-time (July of previous year for application for first-time running of an event.) |
|
ACP brevet |
A brevet of one of the standard distances: 200km, 300km, 400km, 600km, or 1000km, sanctioned by Audax Club Parisien. In PBP years, ACP brevets act as PBP qualifiers (if scheduled before the PBP application deadlines), and possibly towards foreign Randonneurs Mondiaux 1200k-and-longer events. ACP brevet medals are available to finishers. These events count for credit for the ACP Randonneur 5000 and ACP Super Randonneur awards, as well as RUSA awards. |
|
ACP flèche |
A team event in which at least 360km must be covered within 24 hours. An event of this type is required to qualify for the ACP Randonneur 5000 award. Also counts toward various RUSA awards. |
|
RUSA brevet |
A domestically-sanctioned brevet of any distance from 200km to 1199km. These cannot be used as PBP qualifiers nor do they contribute to any of the ACP awards. No distance-specific medals are available to finishers; however, credit toward RUSA medal awards is given and these events can be used as qualifiers for all of our domestic 1200km events. |
|
RUSA populaire |
A domestically-sanctioned event of any distance from 100km to 199km, operated in the same style as a brevet. These events do not contribute to any of the ACP awards. RUSA gives credit toward RUSA awards. |
|
RUSA arrow |
A domestically-sanctioned team event patterned after a flèche. At least 360km must be covered within 24 hours. Arrows do not contribute toward the Randonneur 5000 award; however, RUSA gives credit toward RUSA awards. |
|
RUSA dart |
A 12-hour version of the Arrow, with a minimum riding distance of 180km. Counts towards the P-12 Award. [11/2013] |
|
RUSA permanent and permanent populaire |
Permanents are domestically-sanctioned rides over established courses that can be done on any date mutually agreed to by the rider(s) and the permanent's organizer. Permanents are 200 km or longer courses; permanent populaires are any distance from 100km to 199 km. These rides earn credit toward RUSA Distance Awards. Permanents also earn credit towards the R-12 Award. Permanent Populaires count towards the P-12 award. Some US 1200k organizers accept Permanents as partial qualification for their events. Note that RBAs do not organize Permanents as RBAs but, like other Permanent owners, as individual RUSA members. [11/2009] |
When a RUSA Brevet vs. an ACP Brevet?
[4/2010]
RUSA Brevets offer a subset of the awards, recognition, and qualifying potential of ACP brevets. When/why would you submit a brevet as non-ACP-sanctioned?
· The distance is not close to one of the standard ACP distances (200km, 300km, 400km, 600km 1000km): for example, the route you’re envisioning may have a “natural” distance which falls in between, but is important to the route concept – e.g., an out-and-back between to an iconic location, or a similarly iconic loop route, such as the circumnavigation of a lake or island.
· You want to hold the event between October 16 and December 31.
· You are adding an event after the deadline to submit ACP events (September 30 of the prior year).
· You need to postpone an ACP-sanctioned event more than a week, and would still like to hold the event. (You’d cancel the ACP event and add a RUSA event to replace it.)
Getting Your Event on the Calendar
Three different sanctioning authorities govern randonneur events held in the USA:
· Randonneurs Mondiaux (RM)
· Audax Club Parisien (ACP)
· Randonneurs USA (RUSA)
The table below summarizes the deadlines for event submissions and the calendar dates for scheduling events with each of the event sanctioning organizations.
|
Event Type |
Deadline for Submission |
Event Calendar Dates |
|
ACP-sanctioned brevets |
Oct 1 year prior |
Jan 1 - Oct 15 |
|
ACP-sanctioned flèches |
Oct 1 year prior |
1 week prior to Easter – 7 weeks after Easter |
|
RUSA-sanctioned brevets, populaires, arrows, and darts |
5 weeks prior (new route) 2 weeks prior (existing approved route) |
Jan 1 - Dec 31 |
|
RM-sanctioned events |
Oct 1 year prior to schedule the event, but July 31 in prior year to submit application for first-time running of the event [11/2009] |
Jan 1 - Dec 31 |
Each RBA is required to organize at least one 200km or longer ACP or RUSA brevet each year. In order to hold ACP and RM events, RBAs submit their proposed dates to RUSA by October 1 of the preceding year. The RUSA Board reviews all ACP and RM-sanctioned events held in the USA in early October before submitting them to the sanctioning organization and placing them on the RUSA calendar. To hold RUSA-sanctioned events, RBAs submit their proposed dates:
· at least five weeks in advance, if the event will use a new or changed route;
· at least two weeks in advance, if the event will use an already-approved route;
· except … at least two months in advance for a 1200km or longer event.
[11/2013]
This allows adequate time for the Board approval process, and for route review and approval (for new/changed routes). Submitting your RUSA-sanctioned events by the October deadline means they will be listed in the autumn issue of American Randonneur along with the ACP and RM events.
[11/2009]
The process for submitting your events:
1. Submit all calendar events, ACP, RM and RUSA, using the web-based calendar submission form. If you cannot use the form, contact the Brevet Coordinator.
2. The RUSA Board reviews the proposed events. You will be contacted if there are any issues with any event you propose.
3. After the Board approves your events, the Brevet Coordinator will contact you via email and your events will appear on the RUSA calendar.
Official vs. Actual Distance of Events
Make sure that the distance for which you schedule your event (which is the official distance) is close to the distance of the route you will use. (The actual route distance must be between 95% and 120% of the scheduled distance, and at least as long as the minimum distance for that class of event (100km for a populaire, 200km for a brevet, 1200km for a Grand Randonnée).
Time Allowed and Credit Given – The time allowed to finish your event is based on the official (scheduled) distance, not the actual route distance. So if you schedule your 1240km Grand Randonnée as 1200k, riders will have 90 hours, not the 93 hours they’d have for a 1240km event. Similarly for a 600km brevet whose route is actually 620km: riders would have 40 hours to complete it, not the 41:45 they’d get for a 640k.
Correspondingly, finishers get credit for the official distance, not the route distance.
ACP-Sanctioned Brevets – Since ACP-sanctioned brevets must have particular official distances (200km, 300km, 400km, 600km, 1000km), you need to tailor your route’s distance to be close to those official distances.
RUSA Populaires and Brevets, Randonneurs Mondiaux-Sanctioned Grand Randonnées – Since these events may be of arbitrary distance (within the distance range of their class, of course), you can schedule them to be close to the actual route distance.
For RUSA events, if you find your route is substantially different from the distance you’ve scheduled, contact the Brevet Coordinator to have the official distance changed, and make sure your control cards reflect the actual time allowed.
For RM-Sanctioned events, you cannot change the scheduled distance after they’ve been submitted to RM (in the fall of the previous year), so make sure that your actual route is close to the scheduled distance.
[1/2015]
Canceling or Rescheduling Events
If you must cancel or reschedule an event, contact the Brevet Coordinator immediately.
ACP-Sanctioned Events - You may reschedule up to a week after the scheduled date for safety reasons or because the route is impassable on the scheduled date (examples: black ice/snow; bridge out or road segment closed due to construction). If conditions would require you to reschedule past the one-week mark, and you still wish to hold the event, consult the Brevet Coordinator for options of converting it to a RUSA (non-ACP) event.
[3/2010] [11/2009]
Changing RUSA brevet dates is more flexible if there is enough time beforehand. For either event type, contact the Brevet Coordinator immediately to discuss your situation. Do not make changes to your dates without RUSA approval.
Date of Event Credit - Event credit goes toward the original schedule date. If the rescheduled event falls in the next month, for example, R-12 credit is for the original month. This could an issue to consider in converting to a (new) RUSA event.
[1/2011]
Terminating an Event In Progress – If you need to terminate an event already in progress because of emergent safety, course, or other issues, submit results for any riders who have already finished or successfully pre-ridden the event.
[3/2012]
Pre-Riders – If an event must be cancelled or terminated as in the cases above, submit results for any riders who’ve pre-ridden the event (as described below).
[3/2012]
Pre-riding Events for Credit
An RBA and/or event volunteers may pre-ride the route of an ACP or RUSA-sanctioned brevet or populaire up to 15 days in advance. Submit a volunteer’s pre-ride results as if the volunteer completed the event as scheduled on the calendar. This means, for example, that a pre-ride done in the month previous to the event counts towards R-12 credit in the month for which the event was scheduled (not the date on which it was pre-ridden).
IMPORTANT: Notify your pre-riders that they will not get credit for the pre-ride if they ride an event or permanent, or pre-ride another event, whose event date conflicts with your event date. Do not submit results for a pre-ride if the rider rode another event for credit on the date of the scheduled event (and the rider could not have completed both events as scheduled). This situation can occur when multiple events are scheduled for the same date (in the same region or in different regions), or the rider rode a permanent.
There is no provision in BRM regulations for any "make-up" rides.
[3/2010] [2/2011] [1/2012]
A volunteers’ pre-ride is a favor to the volunteers who will put on a ride. It's not supposed to be a burden on you.
A volunteers’ pre-ride is also not supposed to be a scheduling alternative. While the volunteers’ pre-ride is for the volunteers who will be working on the main event day, this is not an absolute rule and non-volunteer riders along provide an extra set of eyes on the cue sheet and company for the ride. Any such rider is probably a long-standing volunteer who helps out on lots of other club activities and rides.
Assuming that you are only dealing with volunteers for the brevet, you just need to try to strike a balance between meeting the needs of those volunteers and not driving yourself nuts. Although RUSA has no rule requiring that there only be one volunteers’ pre-ride, you have absolutely no obligation to arrange for more than one. Generally, you (or the ride organizer, if you have delegated the ride to another person) should decide when you are riding (if you are pre-riding yourself), let the other volunteers know and go. Folks that can't make the volunteers’ pre-ride and absolutely need the ride credit can be released to do the main ride. They can volunteer another time.
As for documentation, let the volunteers sign each others’ cards where there are no stores at a control. (If they can grab a receipt in a nearby town, so much the better). If the start/finish is not at or near an open establishment, let the volunteers get a receipt from the nearest coffee shop to the start, sign their cards at the start, sign their cards at the finish and then get a receipt from the nearest pub to the finish. If a control requires event staff because there are no establishments nearby (or good info questions), or because riders need support in an area of sparse services, remember you’ll need to arrange for a volunteer to staff that control.
[2/2011]
Encourage the pre-riders to ride together. That's way more effective for scouting the route, checking the cue sheet, etc. It should be a fun, team event. Riders who are riding for PRs aren't going to be doing a good job of scouting.
A pre-rider who fails to finish may be allowed to ride on the event date.
[11/2013]
Multiple Events on Same Day
ACP and RUSA prefer that you schedule a single brevet on a particular day. However, if you want to run multiple events on the same day, RUSA allows this only under the following conditions:
· The event distances are substantially different. For example, a 200km and a 300km are substantially different. A 200km and a 220km are not substantially different.
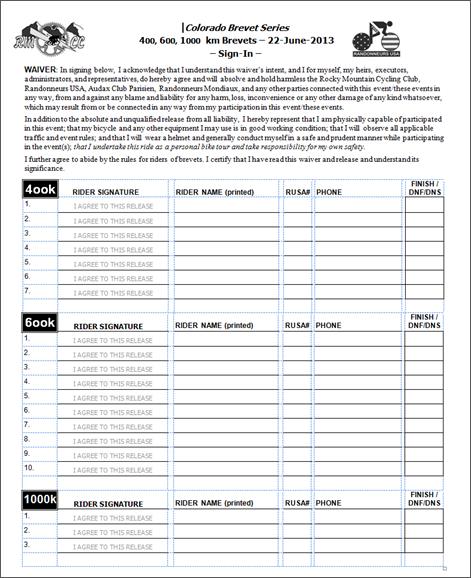
· Each rider signs up for and rides one particular brevet. The RBA must show that each rider has signed up for one particular event by using specific sign-in sheets for each event scheduled that day. Riders may not change events once the event has started.
If you run more than one brevet per day and you are a new RBA, do the following:
· Create a separate sign-in sheet – or area on your sign-in sheet – for each scheduled event.
· Make copies of the sign-in sheets immediately following the event.
· Submit the original sign-in sheets to the Brevet Coordinator
· Mail the sign-in sheets within 10 days after the conclusion of the events. The Brevet Coordinator will check that the results you submit correspond to the appropriate sign-in sheets, and that each rider has signed only one sheet.
If you are not a new RBA, the Brevet Coordinator may still request to see the originals of your sign-in sheets, so be sure to preserve them.
[11/2013]
One approach for a multi-event sign-in sheet, so riders don’t have to hunt for the right piece of paper, just the right spot on the sheet:
Late-Season Events
To schedule events after October 15, schedule them as RUSA brevets. The ACP homologates American brevets held between January 1 and October 15. However, ACP delays until December the processing of results submitted after October 15, and homologates them with the next year’s rides. As a result, if you have ACP events in October, or wait to submit late season brevets results in October, there will be a significant lag before you receive your certificate numbers and some riders may not be able to apply for their Super Randonneur awards.
Scheduling Grand Randonnées (1200km and Longer)
In order to hold a Randonneurs Mondiaux (RM) Randonnée in the US, you must submit the event to RUSA for approval. You can download the RUSA 1200k Guidebook. For the first-time running of an event, you must submit a 1200k Application (Word (e-mailable) or PDF) and accompanying materials by July 31 of the previous year - note that this will require some research and foot (or pedal-) work.
[11/2009]
After approval by the Board, RUSA will submit your event to the President of Randonneurs Mondiaux. The deadline for submission of your RM event to RUSA is October 1 of the year preceding the event. If you offer a 1000km ACP brevet option, or 1000km and 200km, in conjunction, you must also submit these events to RUSA no later than October 1.
Scheduling Flèches
The Flèches-USA team randonnées can be run from one week before Easter to seven weeks after Easter. The late dates after mid-April are generally reserved for regions with harsh winters, such as the Rocky Mountains, Great Lakes, New England, etc. The Flèche Vélocio, upon which the Flèches-USA are based, is always an Easter-weekend event — and in France, with its northerly latitudes, this can include some cool springtime temperatures, not to mention an increased chance of precipitation. The main thing that characterizes this challenging 24-hour event is that the day and night hours are roughly equal being close to the spring equinox, and this makes it harder than holding it closer to the summer solstice. If it is thought that traditional Easter celebrations for riders' families will limit Flèche participation, RBAs in regions with warmer spring weather can hold their event one week before or after Easter. (Also note that teams can start their ride as early as Thursday noon if they want to keep Sunday open for family and/or religious activities.) Scheduling the Flèche in May or June, in the warmer areas, will deprive riders of having the personal pride that comes from completing a tough 24-hours in the saddle at Easter like most other Flèche riders in the nations of the Randonneurs Mondiaux. American RBAs can schedule their Flèche event when they please in the eight-week period, but holding events in May or June in warm-weather regions is not in keeping with the spirit and traditions of the ride.
Event Listings in the Newsletter
If possible, RBAs should submit RUSA events in time for publication in the RUSA newsletter, American Randonneur. RUSA publishes the newsletter in February, May, August, and November of each year. The deadline for submissions is the 10th of the preceding month (for example, January 10 for the February issue). This table summarizes the deadlines:
|
Event Date |
Newsletter Issue |
Submission Deadline |
|
March, April, May |
February |
January 10 |
|
June, July, August |
May |
April 10 |
|
September, October, November |
August |
July 10 |
|
December, January, February |
November |
October 10 |
Insurance
Obtaining Insurance
RBAs are responsible for obtaining insurance for each event. The Insurance and Liability Committee will typically contact you in the January timeframe each year and ask you to provide the following items:
Waiver—Submit a copy of the liability release form that participants sign to the Insurance and Liability Chairperson. All RBAs must submit one waiver each year and in advance of the first event each year. Refer to Liability Release Waiver for details.
Certificate of Insurance— A certificate of insurance (COI) is required only for RBAs who use their own club insurance.
If you do not use separate club insurance, you will be automatically invoiced for RUSA insurance after you submit your event results. Refer to RUSA Insurance for details.
If you do use separate club insurance, submit a copy of your COI demonstrating that you and your club have obtained suitable insurance coverage for your events and that the COI includes Randonneurs USA as a third party insured. Refer to Club Insurance for details. Your club insurance must list RUSA as an added insured and that documentation received by RUSA before the events which it covers – otherwise, RUSA insurance will be used.
[11/2013]
Liability Release Waiver
All RBAs must submit a waiver each year to the Insurance and Liability Chairperson., even if the waiver has not changed. RUSA requires a waiver in advance of the first event each year and will not process results until the waiver is received. (You may e-mail the waiver document, or send a link if you post the waiver.)
You can download the RUSA Waiver of Liability (MS Word) from the RBA website area. Modify the waiver to include your events, your sponsoring club, and your name.
Club or RUSA Insurance?
[2/2011]
You may obtain a policy from an insurer such as American Specialty or through LAB or others to insure your events, or use RUSA insurance. RUSA insurance is per-rider-day insurance (a fixed fee for each day ridden by each rider – see details below), rather than a flat premium per policy term.
· RUSA Insurance is convenient – no policy to maintain. May make sense if you have relatively few events with few riders.
· A blanket policy may be more economical if you hold many events and/or have many riders, or are sponsored by a club that has other rides or events they are insuring. Consult your insurer for details including policy options, membership requirements, etc.
· Some club insurance requires membership in the club. If you have events that attract predominantly riders from afar, they may not benefit from club membership, and you might choose to use RUSA insurance for those events.
[11/2013]
Club Insurance
The following lists of important points concerning club insurance:
· Your club’s insurance policy must name Randonneurs USA as a third party insured. This applies only for your events, not for all the club's activities.
· The address to use for RUSA as third-party insured:
Randonneurs USA
10 Bliss Mine Road
Middletown, RI 02842
[11/2015]
· Assure that the dates cover all hours of your randonneuring events, not just the start date.
· If RUSA does not receive a copy of the certificate of insurance – and documentation of RUSA as added insured - by the date of the event, the RUSA insurance plan applies and you will be required to pay the premium for that event.
Your insurance agent will have a form for naming “additional” or “third party” insureds. You should specify the name as “Randonneurs USA”, and the address as 10 Bliss Mill Rd., Middletown, RI 02842. When setting up your event, other parties may require that your policy name them as additional insureds; examples are owners of property on which you are setting up control points and catering services.
If the sponsoring club already has a policy to cover club activities, make sure that the policy covers your randonneur events. Some club insurance policies will require that your participants be members of the club. Others may require additional premiums if the events are open to the public (non-members permitted to enter) and/or if you charge an entry fee as a condition for participation. Make sure you understand precisely who the policy covers and under what conditions. Skirting the policy rules to avoid paying an extra premium is the fastest way to find yourself without representation when it really counts. Don't.
If your sponsoring club is a recreational club, your Treasurer is most likely the person you should contact for information regarding the insurance policy. If you are forming your own randonneuring club, you might want to seek advice from other RBAs via the RBA email list. Many of them have gone through the process of obtaining insurance. Several randonneuring clubs affiliate with the League of American Bicyclists (LAB) and use the LAB insurance. You may also deal directly with insurers such as American Specialty – it may pay to compare rates.
Some underwriters consider randonneur events to be recreational rides and the club policy covers them; others consider them competitive events, requiring "race" insurance. If you have an agent who considers brevets to be competition, you may find the following "talking points" to be useful:
· Brevets are non-competitive events; they are not races
· Brevets have a fixed-length course to be completed within a fixed time period -- same as a club century that is advertised to start at a given time and to end at dark
· All finishers who complete the course before the cut-off time are considered the same
· No recognition is made of who finishes first or in any other placement
· Finishers are listed alphabetically, not by finishing time
RUSA Insurance
The results submission process automatically invoices RBAs for insurance (if there is no separate certificate of insurance for the event.) Simply print the invoice, and mail it with the insurance fee to the RUSA Treasurer. Fees are due within 2 weeks.
You can also submit your insurance fees by downloading, printing and filling out the RUSA Insurance Submission Form (MS Word or Excel – which autocalculates). Mail the Insurance Premium Submission Form to the RUSA Treasurer.
The premium per rider-day was $1.95 for the 2014 policy period. A rider-day is defined as a 24-hour period during which a rider is participating in the event. All riders are counted, even if they do not finish. Example: suppose 50 riders start a 400km brevet. Forty (40) riders finish within 24 hours, 5 finish between 24 and 27 hours, 3 DNF sometime during the first 24 hours, and 2 DNF between 24 and 27 hours. The total number of rider days is:
40 + (5 x 2) + 3 +(2 x 2) = 57.
Included Coverage
Insurance coverage purchased under RUSA’s liability insurance policy covers people (volunteers, club officials, ride organizers) but does not cover incorporated entities, such as a sponsoring bicycle club. However, club coverage can be purchased at an additional cost of approximately $500 annually. Contact the RUSA Treasurer for details specific to this coverage.
[3/2014]
If you have questions regarding RUSA's insurance policy, contact the RUSA Treasurer.
Routes
Route Design
Route design is the responsibility of the RBA. No universal formula describes the ideal course; however, guidelines and suggestions that might influence your choices follow:
· Out-and-back routes are the simplest to design. They allow you to use the same control points for both directions, minimizing the number of volunteers you might need. Out-and-back courses also get the riders the maximum distance away from the start, possibly into remote areas far from their familiar riding grounds. This makes the randonneuring experience richer and helps build the skills for navigating in unfamiliar territory. It discourages shortcutting to find a quick way home. On the downside, out-and-back courses tempt riders to leave necessary items (clothing, lights, etc.) along the course for retrieval on the return leg. While this is within the rules, it is not entirely in keeping with the spirit of randonneuring preparedness.
· A single-loop route takes more effort to design but offers new scenery throughout. Depending on terrain features and road network, a loop may not require many more controls than an out-and-back route; however, even a few extra controls may stress your ability to provide logistical support and volunteers. It also forces you and your volunteers to operate over a larger area and be more spread apart; increasing the time it may take to respond to emergencies. On the plus side, it prepares riders better by constantly subjecting them to new terrain and by removing the opportunity to dump necessary items for later retrieval.
· A "lollipop" or "figure 8" course combines some of the advantages and disadvantages of the above. The most frequent reason for using one of these designs is road or traffic conditions. A particular stretch of road may be wonderful on the outbound leg but busy or dangerous at the time of day when most riders would be returning; choosing an alternate path on the return leg might be the best option. Some roads are more scenic when ridden in one direction or the other. Other reasons for riding a road in one direction, but not the other, include the presence of a bike lane or shoulder in one direction only, or to avoid a tricky merge or intersection.
· "Daisy" routes composed of a set of loops or out-and-backs that keep returning to the starting/ending point should be avoided. Riders never get very far from the starting point, so it is likely they will be riding on familiar roads the whole time. Others will be tempted to quit each time they return to the starting/finishing point.
· Point-to-Point routes offer the chance to cover the most geographic territory, and can embody a great route concept (for example, "Mountains to the Sea" in North Carolina or "Denver to Aspen" in Colorado). But they are logistically challenging both for riders (who need to find a way back) and for organizers (who can't re-use controls, and whose area to monitor is magnified). Back-to-back events (for example, Globe-to-Show Low followed by Show Low-to-Globe in Arizona) mitigate this challenge … at least for those who can complete both segments. By extension, a chain of multiple events (for example, a circuit of point-to-point brevets) is also possible, with a great payoff for those who can ride every segment, and hopefully some accomodation for riders who find they can’t complete each event in the chain.
· Routes may not include multiple passes over the same circuit (that is, repeated loops - traversing a segment more than once, in the same or opposite direction, is allowed).
Route Direction
You have the option of running a given route in forward or reverse direction (reverse meaning from from finish to start compared with the original cue sheet). For an out-and-back route, the forward and reverse directions are identical, of course. To start from the turnaround point of an out-and-back route, you need to submit that as a separate route.
To certify your route (see below), you need only submit materials for one direction, unless you would use different control locations or different road segments in the reverse direction. While running the route in reverse can provide a refreshingly different experience for the rider, bear the following in mind:
· Control establishments may not be open at the appropriate times when riders encounter them in the reverse direction.
· Traffic, weather, and other “environmental” factors may be problematic in the reverse direction. For example, a quiet, cool, and clear mountain stretch in the morning can become a high-traffic, hot, and potentially stormy segment when encountered later in the day.
· Some turns that are easy and safe in one direction may be difficult, dangerous, or illegal in reverse.
· One-way road segments may make it illegal to ride the route strictly in reverse.
So you may have to adjust your reverse course slightly, or in certain cases, reversing the route may be unsafe, unattractive, or unfeasible. It is up to you to make these determinations, as it is your responsibility to design safe, passable routes in the primary direction.
[3/2010]
Controls
Randonneuring uses controls to validate that riders ride the entire route (without shortcutting) and do so within the minimum and maximum times allowed. Designing a route that includes control points is easier with experience. Local conditions, time of day, and club size or traditions often dictate the types of controls and the distances. The ideal control is located in towns that are spaced such that most riders would likely take a break, whether or not there was a control. The control would have restrooms, food and water available for purchase, or other provisions to get the rider serviced and back on the road. The following sections provide guidelines for determining the location and type of controls to use for your routes.
Controlling for Route Integrity
Place controls primarily to assure route integrity (so as to prevent material shortcutting of the route), as described above. Within that framework, spacing controls at regular, useful distances for refreshment, as described below, is the next priority.
Control Distances
You should space controls at regular intervals between the brevet start and finish. The optimum distance is 50-100km with a maximum of 150km. Hillier route sections might require more closely spaced controls; flatter sections might require further spaced controls. According to the distance, there would ideally be:
· 2 to 4 controls for a 200km brevet
· 3 to 5 controls for a 300km brevet
· 4 to 6 controls for a 400km brevet
· 5 to 7 controls for a 600km brevet
· 6 to 10 controls for a 1000km brevet
Start/Finish Controls
Brevets may have only one start location, and one finish location. For most brevets, these are the same; point-to-point routes are logistically harder to ride and support. You should choose a location that provides sufficient parking and easy access for the riders. The start location should have restrooms if possible. If not, the organizer should know locations of nearby facilities.
One or more volunteers selected by the organizer should staff the start and finish controls between their official opening and closing times. You might want to keep this in mind when selecting a finish control. Sitting in a parking lot, far from services is a sure way to discourage volunteers.
For shorter events, starting at or near a restaurant will encourage riders to gather post-ride, enjoy a meal and share experiences. For longer events, particularly a 400km, you might want to consider starting and finishing at a motel. This allows riders to arrive the night before a brevet that typically starts very early. It also encourages riders to sleep after completing the event. Some RBAs have a motel room available for riders to use for showers and naps following longer events. This also provides a comfortable location for the volunteers working the finish control.
Some RBAs run their events completely self-supported such that there is no volunteer to staff the finish. In such situations, the RBA often designates a drop box for brevet cards. A drop box might be the front desk of a hotel, or a business that has agreed to stamp or sign, date and collect the cards. Another idea is the have riders collect their final control verification, such as a receipt, at a local business and then drop their card packet (plastic bag, card and receipts) through the slightly open window of the RBA vehicle.
In all cases, however, start and finish controls must be timed. (They may not be information or postcard controls.)
[11/2013]
Intermediate Controls
Intermediate Controls can be of the following types:
· Event-Staffed
· Local Establishment
· Information (no opening/closing times)
· Postcard (no opening/closing times)
· … and of course the Secret Control (Event-Staffed)
Intermediate controls are preferrably staffed by event volunteers or located where one or more establishments are open for business during the control times. You might also want to check if the businesses have restrooms available and indicate this on the cue sheet.
Most controls will specify a particular business. Other controls, called open controls, allow the riders to choose any establishment in the town or area. This allows the rider to eat at a choice of restaurants, to grab a quick snack at the local mini market, or to move quickly through the control town using their ATM card to collect a printed bank receipt. When you use open controls, you should also suggest a few establishments.
Another intermediate control type is the information control. You can use these controls in locations where there are no services and the route requires a control to prevent shortcutting the route. Alternatively, you can use them at times when businesses are closed. For an information control, you ask a question that the rider can only answer if he or she is at that location. Ideally, you should locate information controls at prominent locations: road intersections, hard to miss buildings such as churches or fire stations. The question should be obvious if one is there, for example, the distance to a town indicated on the road intersection sign, the color of a particular church, or the price of regular gas at a specific gas station. NOTE: An information control is generally not admissible if the route passes through the control more than once during the event (e.g., as on an out-and-back route).
Another control type is the postcard control. You can use a postcard control when a suitable business is not available. The ride organizer usually supplies a stamped and addressed postcard. At the specific location indicated as a control, the rider signs, dates and mails the postcard. NOTE: A postcard control is generally not admissible if the route passes through the control more than once during the event (e.g., as on an out-and-back route).
Secret controls can be located anywhere along the route. They do not have the time constraints of a timed control, because riders are not required to maintain at least the minimum average pace (or stay under the maximum pace) at every moment of the event, only through (published) controls. Example: rider takes a sleep break at a control and leaves it after it closes, with the aim of making up the time en route: a secret control right after that might be outside the closing window, if the control were timed.
[11/2013]
When to Use an Event-Staffed Control
[2/2011]
Many regions primarily use local establishments as intermediate controls: they provide a timed validation and rider support without the need for event staff. When might you consider an event-staffed control?
· Large Ridership (especially early in the route) – Local establishments may welcome the extra trade that randonneurs bring, but not if there are so many they overwhelm the staff or impede other customers. An event-staffed control relieves that burden – but take care to avoid giving the impression that you are robbing local stores of business (e.g., by setting up in their parking lot without some prior arrangement).
· Support Needed in Sparse Region – Your route may go through an extended stretch without services – and often the most scenic areas are the most sparsely served by stores, etc. While you might be able to find some good information control questions or an isolated post office, the riders may need support which event staff could provide.
· Culture – You or your sponsoring club may just prefer to offer a more staff supported event.
Elevation Gain
The general guideline when designing a brevet route is to include approximately 5,000 feet of climbing per 200km (or 4000 feet per 100 miles). Some regions offer switchbacks up a mountain; others offer miles of riding straight up the mountain. PBP has constant rolling hills, but no mountains. Hills add character to your event. However, too many hills can be overly discouraging. The rider’s objective is to finish. Do not make the route too hilly (or otherwise strenuous); make it doable.
Many riders like to see a route profile. This will help them with planning their rides. So, if possible make route profiles available on your website or with the cue sheet.
Elevation Challenges and Control Time Windows
There may be cases where, because of the elevation gain or descent to an intermediate control, the standard opening/closing times are unduly restrictive. In these cases, a control without opening and closing times may be permitted even if it’s staffed or at an establishment. This requires the approval of the Route Coordinator - please explain the circumstances with your route submittal. Of course, the total time allowed for the full brevet remains unaffected.
Intermediate Control Time Windows and Longer Randonnées
Riders are required to pass through timed intermediate controls within their opening time window. The Rules for Riders and Rules for Organizers clearly specify under what (limited) conditions a rider may get credit for a ride after missing an intermediate control cutoff.
A caveat about longer events: control cutoffs slacken beyond 600km: controls within the first 600km reflect a minimum pace of 40 hours per 600k; beyond 600km, riders are allowed more time per km (e.g., 50 hours for the second 600km of a 1200km randonnée). Please emphasize these constraints to riders on your longer events: it is not acceptable – except for the reasons detailed in the Rules for Riders – for a rider to miss intermediate cutoffs, even if he/she finishes within the overall time limit.
[11/2013]
Verifying Routes
RUSA does not provide tools for verifying routes. Many RBAs design and enter their routes using mapping software then scout their routes using their automobile or bicycle. Finally, the best way to verify that a route meets all the requirements including distance, controls and available services is to ride the route. Be sure that you ride the route during the same time of day and day of week (and in some cases the same season) as your event. Traffic conditions may vary greatly for different times of the day and different days of the week.
Preparing Cue (Route) Sheets and Maps
The style and content of cue (route) sheets vary greatly between the regions. RBAs generally use a word-processing program or a spreadsheet to prepare cue sheets. Word processors allow better control over formatting and spacing but do not provide any help with addition of cumulative or inter-cue distances. Spreadsheets are handy but often have limited choices for font size and spacing. Pasting the source spreadsheet into a word document may be a good hybrid solution.
Essential cue sheet elements:
· cumulative distance from the start (or from the previous control)
· distance from the previous cue
· action (left, bear right, cross, etc.)
· control locations and their opening and closing times
· the road name or number - as actually seen at that location - (This is the most common problem with routes create solely by reference to maps, mapping software, or online mapping resources. If those tools are used to create the route, it is essential to ride or drive the route beforehand to uncover any such problems.)
Distances are usually given in miles and tenths of miles but for 1200km+ events with many foreign participants, you might additionally offer kilometer distances. (Mileage distances are still required.) This is trivial to prepare if one uses a spreadsheet.
Other content (see more detailed discussion below):
· warnings such as traffic, railroad crossings, road surface, or other hazards,
· intermediate or supplementary cues (not affecting turns) to help the rider confirm he/she is still on the route,
· and landmarks leading up to turns,
· services such as stores, restrooms, lodging.
[3/2010]
Control Open/Close Times
Once you have designed your route and specified controls, use the control point calculator to determine the opening and closing times for your brevet's controls. Specify these times on the cue sheet and brevet card. There are separate calculations for ACP-sanctioned, RUSA-sanctioned, and 1200km+ RM events, as their opening and closing times differ slightly.
Note that, brevets may have only one start time, for example, you cannot offer a 4AM and 7AM optional start time for a 400km brevet. With RUSA approval, 1200km+ RM events may offer more than one start time.
Services, Intermediate Towns and Passes
If there are towns and opportunities for services such as food, drink, restrooms, etc. between the controls, include them on your cue sheets. This information helps riders with planning. Additionally, indicating the opening/closing hours of stores and restaurants helps riders determine which late-night services might be available. If your route includes mountain passes, it is useful to riders if you indicate the summits, their milepost location and elevation.
Road Cues
Confirmation that a road has a stop sign, traffic light, "T" intersection, or some other landmark nearby aids navigation at night and allows educated guessing if road names are missing. You should also indicate turns and cues that are easy to miss, for example, turns on quick descents or unmarked intersections.
Include a legend for short hand notations; these notations are not always obvious to new or out of area riders who have never ridden your brevets. For example: SS – Stop Sign, SL- Stop Light, FL – Flashing Light, bc – becomes.
Contact, Abandonment and Emergency Numbers
Cue sheets should have the name and telephone number of the organizer so that a rider who abandons or needs assistance can call in. Some rural areas have not implemented "911" emergency service; if this is true in your area, include the telephone numbers of local emergency responders in the areas your ride pass through.
Cue Sheet Layout
Many riders will want to fold the route sheet into quarters so that it conveniently fits onto a handlebar clip, slips into a map case, or into a sandwich bag for protection from the rain. Make sure you lay out your route sheet to allow for folding. Your riders will appreciate not having to turn the cue sheet at awkward places on the route, so start a new quarter-sheet after each control.
Printing Cue Sheets
Print or copy route sheets with black ink on white paper. Avoid pastel and dark shades of paper; these do not provide as much contrast as white paper at night.
Route Maps
Maps are a great idea, even though it means more work for you. A cue sheet alone cannot help a lost rider get back on course. A map allows riders to "see where they've been" and perhaps judge the terrain ahead. Where a cue sheet provides direction that may seem ambiguous to a rider, a map may save a navigation error. In emergencies, a map helps identify nearby towns where a rider might obtain medical aid or a bicycle. Unless your event is in an area with few roads, it is advisable to highlight your route on the map so that riders have a chance of figuring out where they are and where they are supposed to go. Highlight the control towns (e.g., in a different color) so that riders can rapidly determine which part of the map to focus on. A map that is too small of a scale is almost useless; an extra sheet of paper weighs almost nothing and can save hours of frustration.
Note that whereas a route map is a nice option for your rides, it is required when you submit your route for approval.
Preparing Brevet Cards
There are several options for creating brevet card masters. It is important to use the correct card master for the event. Each master shows the overall sanctioning body on the top of the front cover. ACP-sanctioned events use the ACP (BRM) card master; RUSA-sanctioned brevets use the RUSA card master, etc.
Brevet Card Masters
Master brevet cards are available in the download area of the web site. Edit the files to reflect the specifics for your event. For example, change the distance, the club name, the date, and the control information. Be sure to select the appropriate brevet card master for the type of event that you are organizing.
Adobe PDFs - There is also a selection of brevet card masters in Adobe Acrobat format in the download area of the web site. These feature fill-in blanks that can be edited for your specific event and region. You may also print a copy on 8.5"x11" size paper and manually fill in the specifics for your event. Use this as your master copy for photocopying. In general, the Word format may work better for you, as you can save the edited card electronically for later use.
Printing Brevet Cards
There are also several options for printing the brevet cards.
For large runs, it is easiest to print or prepare the master copy and to have it duplicated at a local copy shop. The masters should be duplex photocopied (two-sided copies) onto card stock or cover stock rather than plain paper. Cutting the completed copies in two will yield two control cards per sheet. Note that longer events such as 1000km or 1200km may require a different brevet card layout.
Longer Events – There is also a master for events with more controls than will fit on the two-per-sheet portrait format. This is a landscape format that yields one card per sheet. This is mainly intended for 1000km and longer events.
The card stock used for brevet cards should be white or light pastel in color. Dark colors do not photocopy well, are difficult to read in low-light conditions, and signatures and time-stamps may not show up properly. When applying for certain ACP awards, riders must submit copies of the brevet cards. Dark-colored cards are difficult to photocopy for this purpose and may be rejected.
If you edit your master on the computer, you may be able to print directly onto card stock. Not all printers are capable of handling the thicker stock and the cost per page for printing on your home printer may be higher than at your local copy center. However, it may be practical for small runs.
Avery Office Products makes cardstock in the proper size for brevet cards. Product #05315 "Laser Note Cards" is a box containing 30 (8.5"x11") sheets for laser/inkjet printing and 60 matching envelopes. Each sheet is pre-scored for clean separation of the top and bottom halves, yielding two cards per sheet. In addition, each card has a pre-embossed fold line. This is not a particularly cost-effective way of making cards (the product's list price is $21.50, making the cards approximately $0.35 apiece). However, it certainly is convenient for small runs to avoid a trip to the copy center.
Some RBAs print cards and then affix address labels to them for pre-registered entrants. These labels would typically have the name, address, RUSA number, and rider’s club affiliation. The data for such labels can be generated by selecting entries from a spreadsheet or database application. An up-to-date copy of the RUSA Member List (text) may be of use in maintaining your local database of entrants. The Current Year Brevet Results (zip) databases may also be useful for preparing brevet cards or checking the preparation of participants in your event.
Getting Your Route Approved by RUSA
RUSA requires all RBAs to submit copies of routes for approval when:
· a new route is designed
· major revisions occur
· upon RUSA request
You should submit your routes to the Route Committee at least two months before it’s used in an event so that any issues can be resolved well in advance. Send your submissions and inquiries to the Route Coordinator at Routes@RUSA.org. The Route Committee will examine routes and make comments if necessary. Once the Route Committee approves the routes, they will be certified and placed in the route database.
Route Items to Submit
Submit all of the following to the Route Committee:
· Brevet Route Application Form (to be filled out and e-mailed or printed)
· Cue sheet including controls
· Map materials that show (1) the route as a whole, (2) the controls, and (2) the road network through which the route passes. Depending on format, this can be one and the same map - for example, a highlighted paper map, or a zoomable electronic map (see below). Or you can supply separate overview and detail images.
· Note substantive or apparent route integrity issues (helpful if highlighted on map) - just explain why additional controls aren’t called for; for example:
· difficult passage due to road surface (e.g., dirt washboard, debris-filled)
· significant climbing, traffic congestion, or other factors impeding progress
· prohibited to or unsafe for cyclists
or, in the absence of the above,
· candidate for a secret checkpoint (event staff may be present to help riders stay on course).
Acceptable Formats - You may submit your materials in hardcopy or electronic form (e-mailed or posted on the Web). The following electronic formats are accepted: Word (.doc, docx), Excel (.xls, .xlsx), PDF, or picture formats (.jpg, .bmp, .gif, .tiff) and Microsoft Streets & Trips or DeLorme Topo source files. Some online mapping tools such as Google Maps (maps.google.com) or RideWithGPS (www.ridewithgps.com) are also acceptable, but you need to check first: not all online mapping tools are created equal. If you wish to use other formats or online tools, contact the Route Coordinator at Routes@RUSA.org in advance to see if they’re acceptable.
Also: if you use an online mapping tool, you will still need to construct your own cue sheet. It can be derived from the cues generated by the mapping tool, but you will need to verify and adapt the cues as described below, and produce your own sheet.
[11/2013]
Once your route is approved, the Route Coordinator will send you a route certification number.
Communicating with the Routes Committee
[3/2010]
· Your initial contact should be with the Route Coordinator at Routes@RUSA.org .
· Your route will be assigned to one of the committee members, who will contact you directly with any questions, issues, etc.
· You may have a delegate submit a route for your region. The committee will then communicate with that person. However, the responsibility for submitting a route in time and for responsive communications rests with you. If the committee encounters difficulties dealing with your delegate, it will revert to dealing with you instead.
Minor Route Changes
Once approved, you may make minor changes to the route without the need for further approvals. Minor changes include:
· Moving a starting point or intermediate control point to a nearby alternate location (5 miles away from the original point is reasonable; a new location more than 5 miles away from the original point should be checked by the Route Coordinator)
· Adding a control point
· Re-routing for new traffic patterns or avoidance of heavy traffic, so long as route integrity is not affected
· Re-routing to avoid construction or poor road surfaces, so long as route integrity is not affected
Obviously, minor changes may add up to significant changes over the course of several years. RUSA recommends you re-submit your current routes if enough changes have accumulated since their last approval.
Route Approval Guidelines
The Route Committee examines routes to ensure that they adhere to the rules and are of suitable quality as follows:
· Are the routes of a suitable design (i.e., not repeated passes over a single loop)?
· Are the routes of sufficient length, but not too much over the nominal distance?
· Are there an adequate number of controls?
· Are controls situated to insure route integrity?
· Are the materials submitted of generally good quality or are there obvious errors?
The Route Committee does not certify that the route:
· is within acceptable norms of safety,
· does not have excessive climbing or too little,
· is actually passable for cyclists - vs., for example, an unpaved jeep road, “primitive” pass road, bridge prohibited to cyclists, etc.
· is reasonably pleasant - vs., for example, a high-traffic road, or a badly-maintained road with potholes.
These are unfeasible to evaluate without local knowledge or detailed information beyond the scope of the Route Committee. When any of these issues are apparent from the submitted materials, the Route Committee may raise them with the submitter, but they are the responsibility of the RBA in constructing a safe, passable, appropriate route.
[3/2010]
Other Route Considerations and Notes
Automobile Odometers and Bike Computer Calibration
Automobile odometers are less accurate and have less resolution than a well-calibrated bike computer; it is common for automobile odometers to read 5-10% higher or lower than the true distance. There are several good web sites describing various methods for calibrating your bike computer.
Computer Mapping Software and Physical Verification
Computer mapping programs may offer some assistance but the resulting route should be verified by physically examining the route to verify street names, other signage (or lack thereof), surface quality of roads (i.e., paved vs. gravel), etc. Roads may have several different names (for example, “Bus. US-32A” and “Old Millford Pike”). Verify which of these is used at cuepoints for your route, and if signage is missing, try to find other cues to pinpoint the turn, intersection, etc.
Support Vehicle Route
If some riders in your events will use personal support vehicles (PSVs), it is a good idea to write out driving directions to your controls. This ensures that drivers of PSVs follow your route rather than choose a route that will pass by or interfere with the cyclists. The driving directions should quote the rules that prohibit PSVs from following riders or providing support outside the controls. If there are parking restrictions at controls due to limited space, this is a good opportunity to inform PSV drivers of nearby alternatives.
As the event organizer, you may restrict PSV activity in any manner you think is necessary for the safety and integrity of your event. For example, you may require that PSVs register, carry certain signage, follow specific routes, park in specific areas, etc. You may also prohibit them entirely. Even if you permit PSVs, you may want to discourage their use. Here is one RBA's solution: driving directions for PSVs on one side a page and an anti-PSV statement on the other.
Dirt-Road Brevets
Some RBAs are offering brevets and populaires that are primarily, or entirely, on dirt roads. These events can be appealing to some randonneurs with off-road cycling experience, or because they offer tranquil country roads not often used by cars. This style of riding also hearkens back to the origins of our sport in France and Italy a century ago. Please note that all the normal brevet regulations apply and there are no special provisions for dirt-road brevets such as a reduced minimum pace, and this can make a dirt road event a good deal harder than a regular brevet, especially if there are a lot of steep hills on the route.
In addition, the vast majority of contemporary randonneurs expect that brevets be run on paved roads, so these dirt-road events are best when offered as an addition to the usual paved-road brevets on your calendar, not instead of them. Riders may be entering your brevet to qualify for a 1200km event, or to earn various randonneuring awards. If the only brevet of a particular distance in your region is on dirt, that is unfair due to the increased difficulty. Please also note that unlike a paved-road brevet, rain can turn a dirt-road brevet into a muddy test of survival and you should expect a very high DNF rate.
Thus, it is essential the dirt road brevets are advertised as such so that no one enters under the mistaken idea that it will be a normal event. (On the other hand, a regular brevet with a short section of unpaved road, such as from road repairs, should not bother a randonneur.) For a dirt-road brevet, you should also give a general advisory in the pre-ride publicity about what width tire works best if regular tires are not suitable. Another consideration for the organizer is that remote regions lacking paved roads often do not have mini-marts to use as controls, so you will probably need to use volunteers to staff the controls on the route. You will also have to offer food and water to the riders. You should consider these requirements as you design your route and plan your entry fee.
Alternate Route Segments
[11/2009]
The spirit of a brevet is that everyone should essentially be "riding the same event" (time of day, weather, mental state, etc., aside).
· An alternate route segment as part of a route's design is ok to respond to foreseeable conditions that a given running of the event may have - for example, a dirt road segment impassable because of heavy rains or a road closure from snows (or other non-weather-related reasons). These would be conditions foreseeable at design time that don't happen often but may occur. This is in contrast to unforeseen detours from wildfire, accidents, road construction, etc. - another policy governs these situations.
· Like any route segment, the alternate should not structurally penalize riders riding it in a certain portion of the allowed time window. That is, riders should not have to wait or ride further because they arrived at the segment particularly early in the time window or rather late.
Examples:
· Adding 20-30 km because a bridge or ferry is closed between certain hours (not ok)
· Routing onto a paved highway of similar distance to a dirt trail for inclement conditions (ok)
· Routing onto a busier road of similar distance for a low-height bridge that sometimes floods (ok)
Transfers and Forced Time Off The Bike
On a related note, be careful of routes that, though imaginative, could force all or part of the ridership to stop or otherwise lose significant time during the event. The 15kph minimum average speed is meant to absorb a certain amount of “inefficiency” in the ability to keep moving forward, but is mainly to accommodate the various paces of riders, challenges such as weather, mechanical problems, extensive climbing, riding in the dark, going off course, construction zones (with flaggers or traffic light), physical indisposition, and the like. A few examples:
· A segment with traffic lights that slow riders down (ok)
· A drawbridge that may impose a five-minute delay for some riders (ok)
· A ferry with a 10-minute wait time and 5-minute transit (ok)
· A ferry with a one-hour crossing and up to two-hour wait time (not ok)
· A ferry crossing that is closed for some nighttime hours which fall within the adjacent control time windows (probably not ok)
· A tunnel with a 5-minute wait while cars are stopped to let cyclists through (ok)
· A busy train corridor with frequent five-minute delays (ok)
· A rail line where freight trains can be parked for an hour or more, blocking the crossings (not ok)
· Hour-long park service shuttle through grizzly territory (probably ok, considering the alternative)
That said, if your region has safety issues where prudence dictates avoiding a segment or area at a certain time of day or night, safety comes first.
The above examples are for illustration. If you feel the nature of your route makes a material delay unavoidable, consult with the Routes Committee or RBA Liaison.
[11/2013]
Crossing Public Lands and Other Jurisdictions
[2/2011]
Your event route may traverse public lands – BLM lands, national or state forests, national or state parks, military reservations, etc. This may in fact be a key feature of your event route. Make sure your event is in compliance with regulations governing those lands. There may be a limit on the number of riders, or a fee based on ridership or other criteria, what kind of support stops you are allowed to set up, or requirements for the riders to show id. Consult the pertinent regulations and the local administrators of the lands you are planning to traverse.
Brevet Medals
Earning Brevet Medals
ACP brevet medals are available to RUSA members who successfully complete an ACP brevet. As an RBA, you can remind your riders whether these medals are available for the event they’re riding, based upon whether it’s ACP-sanctioned or not. Qualified riders may purchase medals directly from the RUSA Online Store. Formerly, RBAs could pre-order and resell ACP brevet medals to riders, but this option has now been discontinued.
As a courtesy to foreign riders from other member countries of the Randonneurs Mondiaux, they may order these medals from RUSA. For example, these riders might be members of the Audax United Kingdom, Alberta Randonneurs, British Columbia Randonneurs, Prairie Randonneurs, Randonneurs Ontario, etc.
The above exceptions aside (foreign riders and new members), RUSA will not accept medal orders from non-members and.To summarize, the following riders can purchase ACP brevet medals:
· RUSA members
· Pending RUSA members
· Foreign riders affiliated with a RM club
If you have any questions or concerns about medal processing, contact the chair of the Medals & Awards committee.
BRM Medal Design (for ACP-sanctioned brevets)
The brevet medal design stays constant for a period of four years. A new medal design appears in the year after each PBP. In PBP years, ACP does not want excess unsold medals, so it requires that national organizations such as RUSA pre-order all the medals they think they will need for the PBP year. Obviously, RUSA does not want to order too many and have excess inventory, nor does RUSA want to disappoint our members who want a keepsake.
Post-Event Processing
Event Results
You should submit the results for your event within 10 days of its conclusion. In PBP years, brevet results in June are due immediately after the event.
Even if your event had no finishers or was cancelled, you must submit a report.
Note that, first time RBAs on provisional status must send their brevet cards to the Brevet Coordinator immediately after submitting results of their first event.
Membership and Results
[2/2011]
Riders are allowed to join or renew their RUSA membership at the start of an event by handing a RUSA official (you or one of your event staff) a membership form with payment. They are considered to be members once they’ve handed these off to the official.
For those riders, and those who have sent in their membership or renewal prior to the event, you’ll need to wait a reasonable time until the memberships have been processed, so that you can enter their RUSA numbers in your results. Results without RUSA number are not visible on the RUSA website to you or to the rider, even after that person’s membership becomes active, and in that state will not count towards RUSA or RUSA-administered awards. While numbers can be patched in later (see below), this is extra work for the Brevet Coordinator and to be avoided. So make sure new/renewing RUSA members have their RUSA numbers.
Joining/Renewing Online – Riders who would like to join or need to renew just prior to your event can do so online, with the benefit that they will have a receipt to print off and show you at the ride start. That way you don’t have to send in their paperwork yourself, and can verify that the rider has indeed joined or renewed.
[11/2013]
Checking Brevet Cards
Begin by examining each control card. Investigate any missing times or date stamps from control points. Calculate the elapsed time for each finisher. Finally, sign or stamp each card you approve.
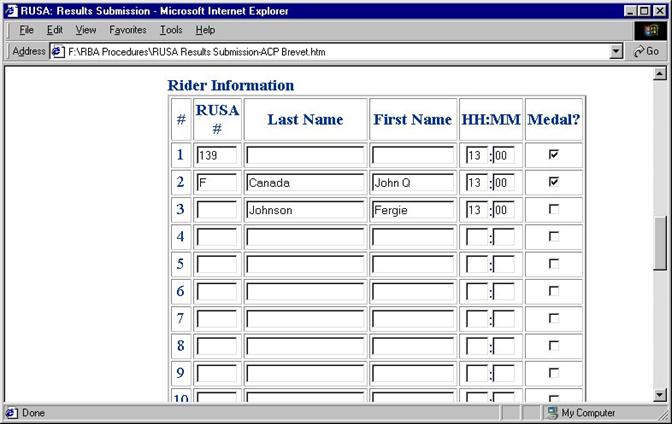
For each control card that lacks a RUSA number, check if the individual has a RUSA number and enter it on the card. Often, members will forget their number or neglect to enter it.
The result submission process is much easier for riders with RUSA numbers than for those without. When entering information into the form, you enter just the RUSA number to identify either a current or an expired member; the name will be supplied automatically from RUSA's membership records. However, if you supply only the number, and it is incorrect, credit won’t be given to the intended rider. Therefore, if you enter only the number, check carefully that the retrieved member name is the right one.
[11/2013]
For finishers without a RUSA number, you must type the full name into the submission form. Consult the membership database to obtain RUSA numbers for current and expired members.
|
|
If you fail to enter a member's RUSA number during the result submission process, their results will be processed as a non-member, the brevet will not be counted as a PBP qualifier for riders applying through RUSA, the results will not show up on the web site, and it will not count toward RUSA or ACP awards. |

If you detect a missing RUSA number after submitting your results, contact the Brevet Coordinator immediately, as it may be possible to repair the submission. That said, it is time consuming for results to be "patched up" after the fact, so getting the RUSA numbers entered correctly is essential. The RUSA web site displays brevet results for members only.
Using the Result Submission Form
After you have checked the brevet cards, entered missing RUSA numbers, and calculated finish times, use the results submission form to submit your results. Detailed instructions are included in the form.
The form allows RBAs to enter rider information directly or to pre-process the results with a spreadsheet and then submit that spreadsheet. It is recommended that you try these programs to determine which approach you will take. In general, RBAs with a small number of participants use the direct entry method while those RBAs with a large number of participants use spreadsheets.
1200km+ Events Only: Submit results in alphabetical order by last name. Contact the Brevet Coordinator for the current format RM requires, which currently includes the nationality and gender of the rider. Replace the “Medal” column (see below) with Nationality and Gender columns. Note that “nationality” is not “country of residence” – A German national currently living in San Francisco has German nationality. Therefore, for your RM events, it’s a good idea to capture Nationality on the registration form.
[11/2009] [11/2013]
Submitting Results - Direct Entry Method
In this method, you enter the data directly into a table of fields on a webpage. It is an optional method for submitting brevet and the required method flèche and other team event results.
For each brevet finisher enter:
· rider RUSA number (if a member or former member), or name (if a non-member),
· finishing time in hours and minutes.
The medal-sold indicator is no longer generally used, as riders purchase their medals directly from the RUSA Store – exception would be a medal given (not resold).

![]()
![]()

The information collected for team events is similar. For each finisher on each team enter:
· rider RUSA number (if a member), or name (if a non-member)
· 22-hour and 24-hour distances
· bicycle type
· For each team, enter the start location, starting time and finish location.
· For the event, enter the location where all teams congregated.
Submitting Results - Spreadsheet Method
The spreadsheet method is only available for submitting brevet results. Use the direct entry method for team events.
Begin by downloading the Microsoft Excel spreadsheet master (zip). An example file is included. These files are for Excel 4.0 or compatible spreadsheet applications.
Make a copy of the spreadsheet master file (RESULTS.XLW). You probably want to name the copy for the ride distance you are submitting, for example 200K.XLW or May200k.xlw.
Open the copy with a compatible spreadsheet program. Enter information for each finisher, one row for each rider. Note, there are field instructions in the spreadsheet to the right.
The spreadsheet includes a macro that will save its contents as plain text with the fields separated by commas. This is called a comma separated values (CSV) file. You must have macros turned on in Excel if you wish to use the macro. When you run the included macro, the file is saved as C:\RUSADATA.CSV. Any previous versions of that file will be overwritten. If you prefer, you may leave macros turned off and manually save the file using File > Save As > CSV (*.csv).
Save the file using run macro (the Macro Name: “Save Results as CSV” or Save As.
Open the saved CSV file using a simple text editor such as Notepad or Wordpad. You may need to set the File Types to “All Files (*.*)” to see the file. Note, you will submit the contents of this file (RUSADATA.CSV), not the spreadsheet itself.
Go to the RUSA website and begin the result submission process. Choose the "spreadsheet" option.
In the Notepad editor containing RUSADATA.CSV, select all text using Edit > Select All and copy it to the paste buffer using Edit > Copy.
On the Results Submissions web page, paste the contents of the entire CSV file (not just the rider data) into the spreadsheet area within the form using Edit > Paste. The Results Submission Page and Notepad will look similar to the figure below.
If you cannot submit your results using this process, contact the Brevet Coordinator.

Other Methods
RBAs with large numbers of participants sometimes use databases or other specialized applications to manage information about entrants. In these cases, it may be advantageous to write a script to extract information directly from a database and create the equivalent of the CSV file described in the previous section. Here is an example file with two finishers.
Organizing Club,Org. ACP Code,Month,Day,Year,Distance
Potomac Pedalers Touring Club,920010,4,15,2000,200
RUSA No.,Last Name,First Name,Hours,Minutes,Medal (Y/N)
405,Kuehn,James,10,9,
,Nonmember,Mary,7,55,
All lines of the CSV file up to and including one that begins with "RUSA No" are discarded. All subsequent lines are considered to be records of finishers. A case-sensitive match on the exact phrase 'RUSA No' is performed; the number and format of previous lines is ignored.
Even though the Club, ACP code, date, and distance have been entered into the form elsewhere, it is suggested that this line be kept in the CSV file for documentation purposes as shown. Note that the fields are separated by commas and that there are no extraneous spaces. Non-members have a null RUSA number field and must have a name entry. The "medal" field is no longer used except for medals given (not resold).
Submitting Flèche Results
[2/2011]
Submit Flèche results using the online tool (rather than the spreadsheet method). You provide extra info beyond what is required for brevets, including team names, starting and 24h locations, distance, bicycle type, etc. Within each team, list the team captain first, followed by the other team members in alphabetical orders.
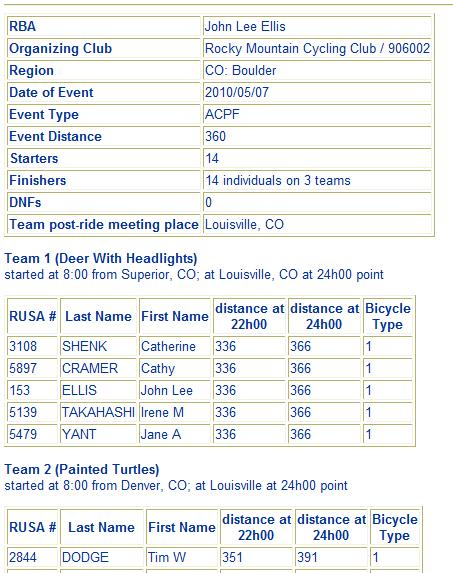
Verifying Results
After entering results through the form or spreadsheet, carefully
look through the summary produced. Ensure that the correct name is shown
for each RUSA member number you entered. If you mistype a RUSA number, credit
will be given to the wrong individual! Also, ensure that the count of medals
ordered and the total number of finishers is correct.
A good idea is to save the results HTML page to a file for later verification (and in the case of RUSA-sanctioned events, to produce stickers for your riders’ brevet cards - see below).
When submitting results for a RUSA-sanctioned event, the summary will include a unique brevet, populaire, arrow, or dart number for each finisher. You enter these numbers on the control cards before being returning them to riders. (See below for a step-by-step example for printing your own stickers.) There are no brevet stickers or medals provided for RUSA-sanctioned events except for the Populaire pin.
Monitoring Results
Many separate processing steps take place between the time that you submit results and the time the brevet homologation sheets and certificates appear in your mailbox. RUSA provides a tool for monitoring the processing status. You may use it to confirm that RUSA received your results, to estimate when results will appear on the web site, or when you can expect certificates will arrive.
During the peak of the brevet season, ACP-sanctioned brevet results that are submitted are batched up over a two-week period before being processed and sent off to ACP. At other times of year, results might be batched over even longer periods. So too, the ACP official who prepares the homologation (summary sheet) and the brevet stickers may also batch incoming results from various countries and process them as a group. Packages of stickers and medals may experience varying delays in international mail. Finally, the Brevet Coordinator might not be able to immediately distribute the contents of the package to RBAs. The brevet processing system is entirely based on volunteer labor. There is only one individual at ACP who performs brevet processing for the entire world outside France.
The ACP requires that all of our Flèche results go to them in one batch. This means that none of the American Flèche results will be processed until all of the events are completed and their results submitted to RUSA. In summary, delays in processing are inevitable and it can be weeks to several months between the time your brevet results are submitted and the stickers and medals arrive at your door.
Results for 1200km+ events may be processed by Randonneurs Mondiaux at one time at end of season, or at times throughout the year. So you may not see your stickers and certification numbers until the end of the year.
[11/2013]
Posting Results on Your Website
Many RBAs post event results on their web sites. If you do this, assure that you list the riders in alphabetical order by name rather than by finish order. For flèches, order the teams by team name rather than by distance achieved. If you post results on your web site before ACP or RUSA officially certifies them, mark them as "preliminary."
Handling Brevet Stickers
ACP-sanctioned Brevets
RUSA will mail you a homologation (summary sheet) and numbered brevet stickers for each of your ACP events. The ACP’s homologation sequence is in the order in which we send results to them: as of 2009, this is alphabetically by rider.
Separate and affix the appropriate brevet sticker on each control card. It is important that you, rather than your riders, perform this step since a control card does not become official until it has the sticker affixed.
Return or mail control cards to riders. Most RBAs return cards at the end of their season or year. This mailing is also a chance to (1) recognize the accomplishments of your riders as a whole and (2) promote your next season and remind riders of the diverse goals they may want to strive for - SR, R-12, Distance, etc.
ACP-sanctioned Flèches
You will receive a paper (card stock) flèche certificate for each rider, typically in September or October. There are no medals for flèches outside France. Most RBAs send the certificates to each Team Captain (who sent in the team's entry) for distribution to each rider, but RBAs can send them directly to the riders if that is preferred.
RUSA-sanctioned Events
There are no stickers or distance-specific medals for RUSA-sanctioned events. Brevet, populaire, arrow, and dart numbers are assigned during the results submission process. You may write the number directly on the control cards before returning them to riders. Or you can make your own labels - see below.
Making Your Own Labels for RUSA-Sanctioned Events
[11/2009]
Some RBAs produce stickers with the rider name, certificate number, event data, etc., which they produce using mail-merge from the tabular output from RUSA results processing. This can actually be less work and less error prone for you, and look more impressive, too. Multiple events can be aggregated into a larger batch of labels to make things more efficient, and cut down on wasted labels.
Here’s a sample procedure:
1. Copy the tabular output from your browser window.
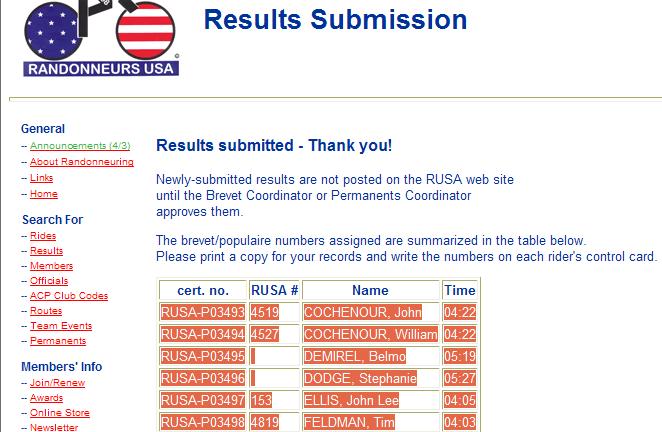
2. (a) Paste into a spreadsheet. (b) Add Event and Date columns.
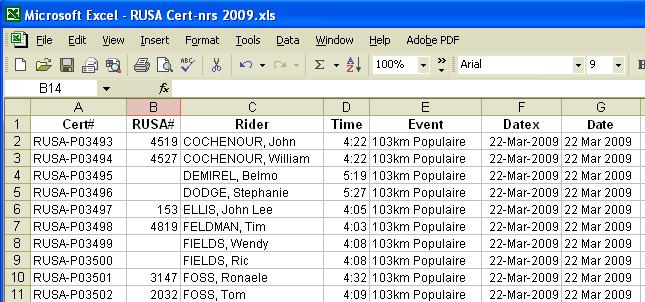
- Use the merge facility in a program such as Microsoft Word to create a label document. The merge template can include “Randonneurs USA” and the RUSA logo, as in this example.
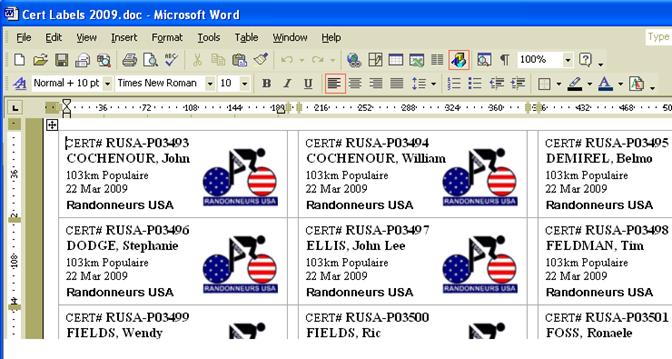
- Print on label stock.
Voilà!
Revision History
11/2015
· Audax Club Parisien and Randonneurs Mondiaux removed as third-party insured from insurance section.
1/2015
· “Official vs. Actual Distance of Events” section added.
3/2014
· RUSA insurance rates updated and details about added insured added.
11/2013
· Start and finish controls must be timed.
· Secret controls – not timed in the manner of timed controls.
· Intermediate control cutoffs – relaxed after 600km.
· Sign-in sheets for multiple events per day – revised.
· Material delays along the route – added note.
· Online mapping software – updated note.
· Can add a RUSA event two weeks prior to the event date if using an approved route, and two weekd in advance for new 1200k+ routes.
3/2012
· Terminating an event in progress. Credit for pre-riders of a cancelled event.
1/2012
· Clarified that policies in this document have the force of rules.
· Added that the RBA needs to make pre-ride volunteers aware that they cannot get credit for the pre-ride if its scheduled date conflicts with another ride the rider did.
· Added address to use for RUSA third-party insured.
2/24/2011
- Staffed controls issue clarified for pre-rides.
· When to use an Event-Staffed control.
- Changing Sponsoring Club section added.
· Results and Pending Memberships.
· Effective date for pre-rides and rescheduled rides.
· RUSA vs. Club Insurance.
· Traversing Public Lands.
· Submitting Flèche Results.
4/23/2010
- RBA Reactivation
- When RUSA brevet vs. ACP brevet?
3/19/2010
- Volunteers’ pre-ride tips.
- Rescheduling an ACP event as a RUSA event.
1/1/2010 – 2/5/2010
- Option for RBAs to sell ACP brevet medals discontinued.
- Reversing brevet route directions – policy added.
· Brevet Route Application Form link added.
10/8/2009 - 11/23/2009
· Step-by-Step instructions for creating your own brevet stickers – section added.
· RBA Volunteer Staff and the RBA Procedures – section added.
· Transfers and Forced Time off the Bike – section added.
· Alternate Route Segments – section added.
· Rescheduling ACP Events for safety/passability reasons – note added.
· What Route Certification does not cover – note added.